
Kada je u pitanju odabir u Photoshopu, doista postoje dvije vrste ljudi - oni koji znaju koristiti Pen Tool i oni koji se bore. Većina ljudi odustaje od učenja kako koristiti alat za olovke što je duže moguće, dok drugi to nikada ne stignu naučiti, vjerujući da je jednostavno previše zbunjujuće, previše komplicirano i jednostavno neprirodno.
Konačno, njihov rad u Photoshopu muči zbog toga što se oni zaglavili oslanjajući se na alat Lasso za gotovo sve što ne mogu odabrati s Pravokutnim ili Eliptičnim alatima za markiranje. U ovom vodiču za Adobe Photoshop zaustavit ćemo patnju. Naučit ćemo koliko je lako izvršiti odabir pomoću alata za olovku.
Kad kažem "lako", ne mislim da ćete čitati ovaj vodič i biti odmah transformirani u Pen Master. Učenje kako koristiti alat Pen je puno poput učenja vožnje bicikla. Jednom kada to naučite, činit će vam se potpuno prirodnim pa ćete se zapitati kako netko uopće ne može znati kako koristiti nešto tako jednostavno. Ali doći do te točke zahtijeva malo prakse i truda, i dok čitate svaku knjigu o tome kako voziti bicikl možda vas nauče osnovama rada papučica, zupčanika i kočnica, to je sve dok se bicikl ne borite zadržati ravnotežu da započinje pravo učenje.
Jedna od sjajnih stvari o Pen Toolu je da to nije nešto što ekskluzivno koristi Photoshop. Daleko od toga! Gotovo svaki popularni program za uređivanje fotografija, grafiku i izgled stranica koristi Pen Tool u jednom ili drugom obliku, tako da nakon što naučite kako ga koristiti u Photoshopu, već ćete dobro razumjeti kako ga koristiti u puno i ostali programi!
Gdje mogu pronaći alat za olovku?
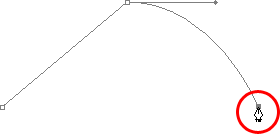
Prije nego što počnemo razgovarati o tome što je Pen Tool ili kako ga koristiti, trebali bismo prvo pogledati gdje ga možemo pronaći u Photoshopu. Alat za olovku naći ćete u paleti Alati, grupirani u alate za oblikovanje, alata za tip i alata za odabir puta (bijela strelica) i alata za direktan odabir (crna strelica) (pogledajte sliku s lijeve strane).
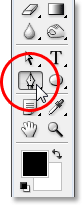
Alat za olovke Photoshopa
To bi, naravno, moglo postaviti pitanje zašto, ako možemo izvršiti odabir pomoću alata za olovke, ako se on ne grupira s ostalim alatima za odabir (Pravokutni alat za maticu, Eliptični alat za lakiranje, Alat Lasso itd.) Na vrh palete Alati? Zašto je dolje s onim drugim alatima koji očito nisu alati za odabir?
To je izvrsno pitanje, a jednostavno se događa da će tako i odgovor biti jednak izvrsnom odgovoru, na koji ćemo doći u trenu.
Zašto se to naziva "Olovka" alatom?
Jedan od prvih kamen spoticanja kod učenja alata olovke, kao i kod mnogih drugih stvari u Photoshopu, njegovo je ime, jer uostalom, ako postoji jedna stvar koju znaju svi koji su je ikad pokušali koristiti, ta stvar nije olovka. Barem, ne onu vrstu olovke kakvu biste inače pomislili kad čujete riječ „olovka“. Pokušajte s njim upisati svoje ime na isti način na koji ćete olovkom potpisati svoje ime na komadu papira i vjerojatno ćete završiti iskrivljenim, zapetljanim neredom i stvarima koji se petljaju jedni preko drugih (naravno, pretpostavljam da moglo bi biti kako potpišete svoje ime).
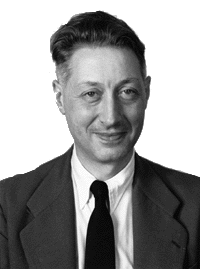 Pierre Bezier
Dakle, ako se ne ponaša kao tradicionalna olovka za tintu, zašto se naziva Pen Tool? Olovka za olovke se tijekom godina zapravo zove nekoliko stvari, i pod tim, ne mislim na takve stvari koje ste ga možda nazivali u trenucima frustracije. Možda ste čuli da se to naziva Bezier Pen ili Bezier Tool, i to zato što ga je stvorio čovjek po imenu Pierre Bezier (to je on s lijeve strane), francuski inženjer i pametni momak sa svih strana koji je smislio maštovita matematika koja koristi alat dok je radila za automobilsku kompaniju Renault (Pen Tool je izvorno stvoren za pomoć u dizajniranju automobila)
Možda ste čuli i Olovku za olovke koja se naziva Alatom za putove i to je zaista najprikladnije ime za to. Pen Tool služi za crtanje "staza". Da bismo odabrali odabir alatom za olovke, stazu ili putanje koje smo nacrtali jednostavno pretvaramo u odabire. To uvijek počinje stazom.
Dodatak za kratke kodove, akcije i filtre: Pogreška u kratkom kodu (oglasi-osnove-sredina-2)
Što je put?
"Put" je, iskreno, nešto što može izgledati malo izvan mjesta u programu poput Photoshopa. Razlog je taj što je Photoshop prvenstveno program temeljen na pikselima . Potrebni su milijuni sitnih kvadratnih piksela koji čine tipičnu digitalnu sliku i rade s njima. Staze, s druge strane, nemaju apsolutno nikakve veze s pikselima, i zato sam rekao da se možda ne čine u mjestu u programu koji se uglavnom koristi za uređivanje i crtanje piksela.
Put zapravo nije ništa drugo nego linija koja ide od jedne točke do druge, linija koja je potpuno neovisna i ne zanima ništa o pikselima ispod nje. Linija je možda ravna ili je zakrivljena, ali uvijek prelazi iz jedne točke u drugu točku, a kao što sam spomenula, ona nema nikakve veze s pikselima na slici. Put je potpuno odvojen od same slike. Zapravo je put toliko odvojen da ako biste pokušali ispisati svoju sliku stazom vidljivom na zaslonu, put se ne bi prikazao na papiru. Također, ako ste svoju sliku spremili u JPEG.webp datoteku i prenijeli je na web mjesto, čak i ako ste sliku spremili stazom vidljivom na zaslonu u Photoshopu, nećete je vidjeti na slici na web mjestu. Staze su samo za vaše oči i Photoshop. Nitko ih više neće vidjeti, osim ako slučajno prođe pored vašeg računala dok radite.
Za stvaranje staze uvijek su nam potrebne najmanje dvije točke, jer moramo znati gdje staza počinje i gdje se završava. Ako upotrijebimo dovoljno točaka kojima možemo vratiti svoj put do iste točke od koje je i započeo, iz staza možemo stvoriti različite oblike, a to točno rade Photoshopovi različiti alati za oblikovanje. Alat za pravokutnik koristi crte koje su povezane točkama za crtanje pravokutnog oblika. Ellipse Tool koristi putove, povezane točkama, za crtanje eliptičnog oblika i tako dalje. Također radi i Photoshop-ov tip alata, iako Photoshop rukuje tipom drugačije nego što ima uobičajene oblike, ali svi su tipovi u Photoshopu u osnovi načinjeni od staza. U stvari, možete pretvoriti vrstu u oblike, što vam onda daje sve iste mogućnosti uređivanja staza s tipom koji dobivate kada radite s oblicima.
Možda ste čuli i staze označene kao obrisi, a to je prilično dobar opis onoga što je put ili barem kakav put može biti. Možemo nacrtati kvadratnu stazu, a ako s njom ne učinimo ništa drugo, kao što je ako je ne ispunimo bojom ili na nju nanesemo crtanje, sve što imamo je osnovni obris kvadrata. Isto je s krugom ili bilo kojim drugim oblikom koji smo nacrtali. Sama staza samo je obris oblika. Tek kad nešto učinimo stazom, poput ispunjenja, nanošenja udara ili pretvaranja u odabir, put zapravo postaje nešto više od osnovnog obrisa.
Možete odabrati cijeli put pomoću Alata za odabir puta (poznat i kao alat "crna strelica") ili možete odabrati pojedinačne točke ili segmente puta pomoću alata za direktni odabir (alat "bijela strelica"). "Segment" staze ili "linijski segment", kako se ponekad naziva, bilo koji je put između dviju točaka. Na primjer, pravokutna staza bila bi sastavljena od četiri točke (jedna u svakom kutu), a pojedinačne staze koje povezuju točke zajedno duž vrha, dna, lijeve i desne strane za stvaranje oblika pravokutnika su segmenti putanje, Sama stvarna staza je kombinacija svih pojedinih segmenata staza koji čine oblik.
To može biti malo zbunjujuće, pa da vidimo na što mislim. Otvorite novi dokument unutar Photoshopa. Nije važno koja je veličina. Ja ću odabrati veličinu 640x480 s popisa unaprijed postavljenih, ali kao što rekoh, nije važno koju veličinu odaberete. Odaberite svoju Pen Tool iz palete Tools (Alati). Alat za olovku možete odabrati i jednostavnim pritiskom na slovo P na tipkovnici.
Dva načina alata za olovku
Prije nego što nastavimo, prvo se moramo pobrinuti da radimo sa stazama, a to je zato što alat Pen ima zapravo dva različita načina rada u kojima može raditi, a po zadanom koristi drugi. Ako je odabran alat Pen, ako potražimo na traci s opcijama na vrhu zaslona, vidjet ćemo skupinu od tri ikone:

Traka s mogućnostima u Photoshopu prikazuje skupinu od tri ikone koje predstavljaju svaki od tri načina alata za olovku.
Znam da sam rekao da postoje dva načina na koja alat Pen može raditi, a opet, kao da stvari čine zbunjujuće, postoje tri ikone, ali ikona na desnoj strani, koja predstavlja ikonu Fill pixels, je zasivljena i nije dostupna tijekom rada s Olovkom za olovke. Dostupan je samo kada radimo s raznim alatima za oblikovanje, tako da uistinu moramo pogledati samo dvije ikone.
Ikona s lijeve strane je ikona slojeva oblika, poznata i kao "ne ona koja želimo", a ona je odabrana prema zadanim postavkama. Ako bismo radili s alatom za olovke s odabranom tom ikonom, crtali bismo oblike, baš kao da koristimo bilo koji od različitih alata za oblikovanje, osim što umjesto da crtamo unaprijed definirani oblik poput pravokutnika ili elipse, mogli smo nacrtati bilo koji oblik koji smo željeli. Kao što rekoh, to ne želimo. Želimo ikonu pored nje, ikonu Paths, pa idite naprijed i kliknite je da biste je odabrali:

Vodiči za Photoshop: Kliknite na ikonu "Staze" na traci s mogućnostima da biste radili sa stazama s alatom za olovku.
Kad je odabran alat Pen i ikona Paths odabrana na traci mogućnosti, jednom kliknite bilo gdje unutar vašeg dokumenta. Ne kliknite i povlačite, već samo kliknite. Kad to učinite, dodaćete malu kvadratnu točku. Ovdje sam je povećao:

Kliknite jednom unutar dokumenta pomoću alata za olovku da biste dodali točku.
Ova prva točka koju smo upravo dodali početna je točka našeg puta. U ovom trenutku, mi zapravo nemamo stazu. Sve što imamo je polazište. "Točka" se tehnički naziva točka sidra ili sidra, a tako je nazvana jer usidrava put na svoje mjesto. Ova prva točka usidrit će početak puta do ovog mjesta unutar dokumenta. Kako dodamo još bodova, svaki će od njih usidriti stazu na svom mjestu.
Dodajmo još jednu točku. Kliknite negdje drugdje unutar dokumenta. Bilo gdje. Krenut ću negdje desno od moje početne točke:

Vodič za Photoshop: Dodajte drugu sidrenu točku klikom negdje drugdje unutar dokumenta.
Sada sam dodao drugo sidrište i pogledajte što se dogodilo. Sada imam ravnu liniju koja spaja dvije točke zajedno! Ta ravna linija moj je put. Kao što sam ranije napomenuo, za stvaranje staze potrebna su nam najmanje dvije točke, jer moramo znati gdje staza počinje i gdje se završava, a sada kada imamo i početnu i krajnju točku, Photoshop je uspio povezati dvije točke zajedno, stvarajući naš put.
Dodajmo još nekoliko bodova samo radi zabave. Kliknite još nekoliko puta na različitim mjestima unutar dokumenta. Opet, ne klikajte i povlačite, samo kliknite:
Dodajte dodatne bodove klikom na različita mjesta unutar dokumenta.
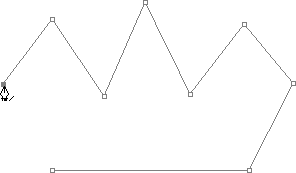
Na gornjoj slici dodao sam još sedam sidrenih točaka klikom na različita mjesta alatom Pen Pen, a svaki put kada sam dodao jedan, duljina moje staze povećavala se jer je novi "segment" staze dodan između prethodne točke i nova poanta. Moj put se sada sastoji od devet sidrivih točaka i osam segmenata staze. Mogao bih nastaviti klikati unutar dokumenta kako bih dodao više sidrnih točaka i segmenata staze, ali ono što bih sada stvarno želio učiniti je zatvoriti svoj put tako da formira cjelovit oblik.
Zatvaranje staze
Da biste zatvorili neku stazu, sve što trebamo učiniti jest kliknuti još jednom na početnu početnu točku. Kad pokažite pokazivač miša iznad početne točke, u donjem desnom kutu ikone olovke pojavit će se mali krug:

Mali kružnica pojavljuje se u donjem desnom kutu ikone olovke kada lebdite pokazivač iznad početne početne točke staze.
Taj nam krug govori da ćemo doći "puni krug" našim putem, završavajući ga tamo gdje je počeo. Da biste ga zatvorili, jednostavno kliknite izravno na početnu točku.
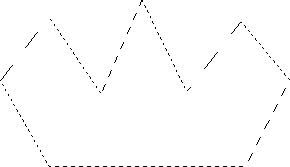
Dolje vidimo da je moj put postao zatvorena staza i da je sada osnovni obris oblika:
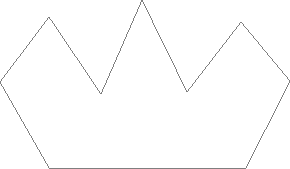
Put je sada zatvoren, završava na početnoj točki, stvarajući zatvorenu stazu.
Iako je ovaj put crtan samo radi zabave, kao primjer kako nacrtati osnovnu putanju Olovkom za olovke, ovaj put mogu lako pretvoriti u izbor. Za to nam treba Photoshop-ova paleta Paths, a to ćemo pogledati dalje.
Pretvaranje puta u izbor
Do sada smo gledali što je to put i kako nacrtati osnovni put pomoću Photoshopovog alata za olovke. Ali kako idete odabiru staze?
Lako! Postoji nekoliko načina da se staza pretvori u odabir, uključujući i praktičnu prečac na tipkovnici, ali prije nego što pogledamo brzi put, pogledajmo službeni način. "Službeni način" uključuje upotrebu Photoshop-ove palete Paths, koje ćete naći grupirane u paleti Layers i Paleta Channels:
Paleta Photoshopovih staza.
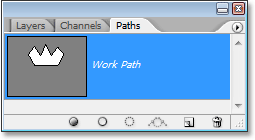
Na prvi pogled, paleta Paths izgleda vrlo slično Photoshop-ovoj paleti Layers, a Adobe je to namjerno učinio tako da ćete se osjećati ugodnije koristeći je. Možemo vidjeti pregled sličica oblika puta koji smo upravo stvorili, a Photoshop po zadanom naziva stazu "Radni put", što je u osnovi fantastičan način da kažete "privremeno", kao da biste stvorili drugačiju stazu bez preimenovanja ovog puta na nešto drugo, ovaj bi bio zamijenjen novim. Možete imati samo jedan "Radni put", tako da ako ga želite zadržati, prije stvaranja novog puta dvaput ćete kliknuti na njegovo ime u paleti Putevi.
Budući da moj put malo liči na krunu, dvaput ću kliknuti na naziv "Radni put", koji će otvoriti Photoshop-ov dijaloški okvir Spremi stazu i preimenovati ću put "Kruna":

Privremeni "Radni put" možete spremiti jednostavnim preimenovanjem.
Kliknite OK u redu kad završim, a sada ako ponovno pogledam u svoju paletu Paths, mogu to vidjeti dovoljno sigurno, moj "Work Path" preimenovan je u "Crown":
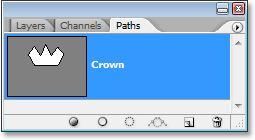
Paleta Paths koja pokazuje da je staza preimenovana u "Crown".
Preimenovanjem puta put se sada sprema i na meni neće nestati ako krenem stvoriti novi put. Također, bilo koji spremljeni putovi se spremaju s Photoshop dokumentom, tako da će se sada, ako spremim svoj dokument, put spremiti zajedno s njim i sljedeći put kad otvorim dokument, put će i dalje biti tamo u paleti Paths.
Spremanje puta nije nešto što trebate učiniti da biste je pretvorili u izbor. U većini slučajeva kada za odabir odabirete alat Pen, nećete imati potrebu za stazom nakon što ste je odabrali, tako da nema potrebe za spremanjem. Ako ste ga ipak željeli spremiti, preimenujte je u nešto drugo osim "Radni put" i to je spremljeno.
Da biste stazu pretvorili u odabir, ako pogledamo dno palete Putevi, možemo vidjeti nekoliko ikona. Te ikone omogućuju nam da radimo različite stvari svojim putem. Prva ikona s lijeve strane je Fill staza s ikonom boje prednjeg plana, a kao što samo ime govori, klikom na nju ispunit ćemo našu stazu s trenutnom bojom prednjeg plana. Zanimljivo, ali to nije ono što želimo. Druga ikona s lijeve strane je Stroke staza s ikonom četke, koja će nanijeti putanju na naš put koristeći bilo koji kist koji smo trenutno odabrali.
Ovo je sjajan način stvaranja zanimljivih efekata u Photoshopu, ali za ovo što radimo ovdje, pretvarajući put u izbor, nije to niti ono što želimo. Treću treću ikonu s lijeve strane, staza Učitaj kao ikonu za odabir:
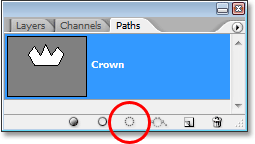
Ikona "Učitavanje puta kao izbora" pri dnu palete Paths.
Čim kliknem na ovu ikonu, moj put unutar mog dokumenta postaje odabir, kao da sam ga stvorio koristeći neki od Photoshopova uobičajenijih alata za odabir:
Put je sad pretvoren u izbor.
To je tako jednostavno! Zapravo, čak je i lakše od toga jer postoji prečac na tipkovnici za pretvaranje puta u odabir bez da se uopće morate prebacivati na paletu Paths. Kad ste nacrtali svoj put i spremni ste ga pretvoriti u izbor, jednostavno pritisnite Ctrl + Enter (Win) / Command + Return (Mac) da bi Photoshop pretvorio put u izbor.
Do sada vam je možda malo očiglednije zašto, iako je Pen Tool vrlo velik alat za odabir, nije grupiran s ostalim alatima za odabir na vrhu palete Alati. Razlog je taj što je Olovka alat prije svega alat za put. Odabir odabire prvo kreiranjem staza, i zbog toga ima više zajedničkog s raznim alatima oblika i alatom tipa koji svi koriste staze nego što je to slučaj s osnovnim alatima za odabir poput Pravokutnog alata za markiranje ili Lasso Alat, koji odabire na temelju samo piksela.
Pogledajmo praktičan primjer onoga što smo do sada naučili. Ovdje imamo fotografiju znaka zaustavljanja ispred nekih stjenovitih litica:

Fotografija znaka zaustavljanja.
Recimo da sam želio odabrati taj znak za zaustavljanje kako bih ga mogao kopirati u vlastiti sloj. Znak zaustavljanja sastoji se samo od niza ravnih linija što će učiniti ovo vrlo jednostavnim. Prvo, treba mi početna točka za moj put, pa ću započeti u gornjem lijevom kutu znaka klikom jednom da postavim početnu točku sidrenja. U ovom slučaju, zapravo nije važno odakle započinjem stazu, ali počet ću u gornjem lijevom kutu:
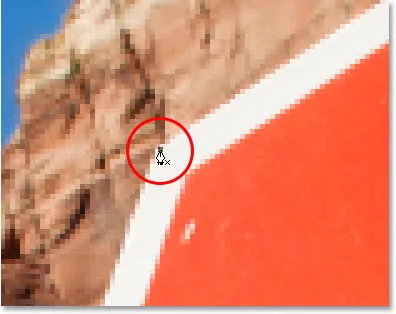
Klikom jednom u gornjem lijevom kutu znaka stop da započnete put s početnom točkom sidrenja.
Primijetite kako se ovdje povećavam kad kliknem. Lakše ćete odabrati odabir alata olovkom za malo zumiranje slike. Na taj način možete biti sigurni da ćete zadržati put unutar područja koje želite odabrati.
Trenutno nemam stazu, samo imam polaznu točku za svoj put. Da bih stvorio put, sve što trebam učiniti je obilaziti znak dodajući sidrište u svakom kutu gdje staza treba promijeniti smjer. Kako dodajem svaku točku sidrenja, pojavit će se novi segment staze koji se spaja s prethodnom točkom sidrenja s novim, sve dok ne zaobiđem znak. Da bih zatvorio put, jednostavno ću kliknuti na početnu početnu točku. Malo je teško vidjeti na slici ispod, ali sada imam put oko čitavog znaka zaustavljanja, uključujući i post uz koji je priložen, jednostavnim obilaženjem kutova gdje put mora promijeniti smjer:

Na slici se sada pojavljuje put oko znaka stop.
Ako sad potražim u svojoj paleti Paths, mogu vrlo jasno vidjeti da imam stazu u obliku znaka stop:
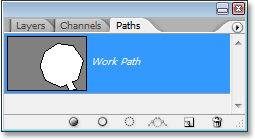
Photoshop-ova paleta Paths prikazuje stazu nacrtanu oko znaka zaustavljanja.
Primijetite kako je Photoshop put nazvao "Radni put", što znači da je taj put privremen i izgubit ću ga ako stvorim drugačiju stazu bez da je prvo spremim preimenovanjem. Čak i ako ne stvorim novi put, ipak ću ga izgubiti kad zatvorim dokument, osim ako ga prvo ne spremim. Ipak nemam potrebu spremati ovu stazu, pa se neću brinuti zbog toga. U većini slučajeva nećete trebati ni o tome brinuti.
Da biste svoju stazu pretvorili u odabir, kliknut ću na put Učitaj kao ikonu za odabir na dnu palete Slojeva ili bih jednako lako mogao pritisnuti Ctrl + Enter (Win) / Command + Return (Mac):
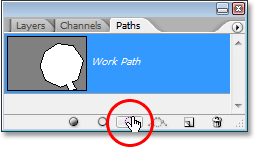
Kliknite na ikonu "Učitavanje puta kao izbor" u paleti Paths ili pritisnite "Ctrl + Enter" (Win) / "Command + Delete" (Mac) da biste pretvorili put u izbor.
Čim to učinim, moj put se pretvara u izbor, a znak stop je sada odabran:

Znak zaustavljanja odabran je nakon pretvorbe puta u odabir.
Prebacit ću se na svoju paletu slojeva i za kopiranje znaka zaustavljanja u vlastiti sloj koristit ću tipkovni prečac Ctrl + J (Win) / Command + J (Mac), koji znak stavlja sam sloj iznad pozadinskog sloja:
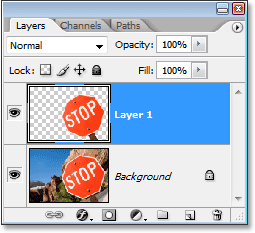
Znak zaustavljanja sada je kopiran na vlastiti zasebni sloj.
Kad znak sada ima svoj vlastiti sloj, mogu raditi što god volim s njim, zamjenjujući pozadinu drugom slikom ili čineći pozadinu crnom i bijelom, a znak ostavljam u boji, bez obzira na što se ja sjetim. Poanta je u tome što sam mogao lako odabrati znak klikom na uglove s Olovkom za olovke, koji je stvorio putanju oko znaka, a zatim sam put jednostavno pretvorio u odabir.
Do sada smo pogledali odabir biranja alatom Pen u Photoshopu i naučili smo da je olovka svaki alat za odabir kao Photoshopovi najčešći alati za odabir poput Pravokutne marke i Lasso Tools, ali umjesto da se odabir vrši na temelju Na pikselima kao što to čine ostali alati, Pen Tool crta putanje koje se mogu lako pretvoriti u odabire, bilo iz palete Paths, bilo pomoću prečaca na tipkovnici.
Zato se olovka ne nalazi na vrhu palete Alati s ostalim alatima za odabir na osnovi piksela, nego je umjesto toga grupirana s alatima za put, poput različitih alata za oblikovanje, alata za unos i alata za odabir i izravno odabiranje puta, Olovka olovke odnosi se na staze, a ne na piksele.
Naučili smo da u svoj dokument možemo dodati točke sidrenja, koje sidrište put na mjestu, jednostavnim klikom na različita mjesta pomoću alata za olovku, a kako dodamo sve više i više sidrijskih točaka, stvaramo put kao svaku novu točku povezan je s prethodnom točkom novim segmentom puta. Također smo saznali da je put ono što se obično naziva "elementom koji nije tiskan", što znači da bez obzira koliko staza dodamo, niti jedan od njih neće biti vidljiv na papiru kad idemo ispisati sliku, One također neće biti vidljive ako sliku prikazujemo na web mjestu. Staze su nam vidljive samo za vrijeme rada u Photoshopu (iako i drugi programi poput Adobe Illustrator također podržavaju staze). Tek kad nešto učinimo stazom, poput ispunjenja bojom, nanesemo potez na nju ili ne pretvorimo u odabir, put postane nešto više od samo osnovnog obrisa neispisanog oblika.
Vidjeli smo kako bi bilo lako upotrijebiti Olovku za olovku za odabir nečega poput znaka zaustavljanja, ocrtavajući je putanjom koja se sastoji od niza ravnih segmenata puta i zatim pretvaramo put u izbor. To je sjajno, ali stvarno, nismo još ništa napravili da nismo mogli lakše s nečim poput alata Lasso ili, još bolje, poligonalnog alata Lasso koji je izgrađen posebno za odabir ravnog oblika poput našeg stopala znak. Velike su šanse, osim ako imate neku čudnu fascinaciju prometnim znakovima, prije ili kasnije poželjet ćete odabrati nešto malo zanimljivije, a pod „zanimljivim“ mislim na izazovnije. A pod "izazovom" mislim na nešto što sadrži krivulje. Odabir zakrivljenog objekta u Photoshopu obično je kada izgubite poštovanje osnovnih alata za odabir. Srećom, događa se i vrijeme kada Pen Tool stvarno sjaji!
Prije nego što nastavimo, moram napomenuti da je sve što smo do sada učinili bilo prilično jednostavno. Kliknite ovdje, kliknite tamo, pretvorite put u izbor, gotovo. Sljedeći dio u kojem smo ucrtali crtanje krivulja nije baš tako jednostavan, mada to sigurno nije teško, ali ako je ovo vaš prvi put s Pen Pen alatom ili s njim nemate puno iskustva, rad s krivuljama može se činiti pomalo neprirodno i čak pomalo neodoljivo. Tu definitivno dolazi analogija "vožnje biciklom". U početku ćete možda nekoliko puta otpasti i zapitati se kako netko to uspijeva, ali što više vježbate i više se držite toga, to više ima smisla počne izrađivati. Ni u kojem trenutku to će vam se činiti kao druga priroda i odjednom ćete shvatiti zašto se toliko ljudi zaklinje da je Pen Tool jedini najveći alat za odabir u svim Photoshopovima! Ozbiljno, stvarno je.
Dohvaćanje ručke s ručicama za usmjeravanje
Počnimo opet s Olovkom za olovke. Otvorite novi prazan Photoshop dokument ili jednostavno izbrišite sve što ste dosad radili u postojećem dokumentu, tako da počinjemo novi. Zatim odabranim Alatom olovke i odabranom opcijom Putevi na traci s opcijama (upamtite da je podrazumijevana opcija Slojevi oblika, tako da ćete morati biti sigurni da je odabrana opcija Putevi) i kliknite jednom bilo gdje unutar vašeg dokumenta, jednako kao radili smo prije. No ovaj put, umjesto da samo kliknete za dodavanje točke sidrenja, kliknite, a zatim povucite miš na maloj udaljenosti od mjesta sidrenja prije nego što pustite gumb miša:
Kliknite bilo gdje u dokumentu pomoću alata za olovku, a zatim povucite na maloj udaljenosti od mjesta sidrenja.
Kad završite, vidjet ćete sidrište s dvije crte koje se pružaju od njega. Na prvi pogled možete pomisliti da smo nekako uspjeli izvući stazu s Olovkom za olovke. Napokon, čini se da imamo tri sidrene točke, jednu na bilo kojem kraju i jednu u sredini, s dva segmenta puta koji ih povezuju. Ako malo bliže pogledamo, možemo vidjeti da su točke na oba kraja nešto manje od one u sredini, te da su zapravo drugačijeg oblika. Ona u sredini je kvadratna, a kao što smo vidjeli, sidrište je četvrtasto, ali oni na oba kraja izgledaju poput dijamanta. Jesu li neke točke sidrenja kvadratne, a neke u obliku dijamanta?
Ne. Sve su točke sidra kvadratne, a sve su iste veličine, što znači da one manje točke u obliku dijamanta na krajevima nisu točke sidrenja. A ako nisu točke sidrenja, to znači da linije nisu segmenti putanje, jer su nam potrebne barem dvije sidrene točke da bismo stvorili stazu, a trenutno je jedino sidrište koje imamo u sredini. Pa što su onda točno te linije koje se protežu od točke sidra? Oni su ručke smjera!
"Ah, ručke smjera!" Ti kažeš. "Sada razumijem!"
… … …………….
"Čekaj, ne neću. Koji su kurac ručke smjera?"
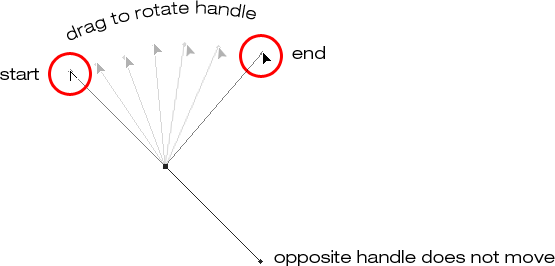
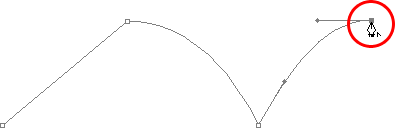
Ručice usmjerenja su, dobro, ručke, a koriste se samo za stvaranje zakrivljenih segmenata staze. Pri stvaranju segmenata ravnih putanja nisu potrebne ručke smjera. Obično ih je dvoje, mada ponekad postoji samo jedan, a kao što smo već vidjeli, pružaju se sidrene točke. Nazivaju ih "ručicama", jer, kao što ćemo vidjeti u trenu, zapravo ih možete zgrabiti i pomicati.
Ručice smjera upravljaju dvije stvari. Oni upravljaju kutom krivulje, a oni kontroliraju duljinu krivulje, i to čine na vrlo uredan način. Razlog što ih ima obično dva je taj što jedan kontrolira kut i duljinu krivulje koja ulazi u točku sidra, a drugi kontrolira kut i duljinu krivulje koja izlazi iz točke sidra.
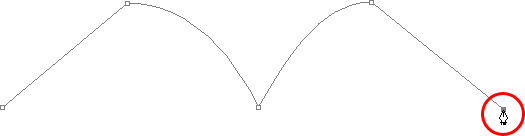
Prije nego što pogledamo kako crtati krivulje ručicama smjera, prvo da vidimo kako upravljati samim ručkama, jer će naš uspjeh u crtanju krivulja puno ovisiti o našoj sposobnosti upravljanja ručkama. Ne brinite, to nije, kako kažu, raketna znanost. Postoji samo nekoliko jednostavnih stvari koje morate naučiti. Već smo vidjeli kako stvoriti ručke smjera klikom na Alat za olovke i povlačenjem dalje od točke sidrenja. Što dalje od točke sidrišta povučemo, to će biti dulje ručke smjera. Što je dulje drška, duža je i krivulja. Kratka ručka, kratka zavoj. Duga ručka, duga krivina.
Jedna od lijepih stvari koje ćete prilično brzo naučiti o alatu za olovke je ta što izuzetno oprašta. Nema razloga da se brinemo kako ćemo ispraviti stvari prvi put kada crtamo staze jer se možemo lako vratiti i popraviti stvari kad završimo! Jeste li mjesto sidrenja postavili na pogrešno mjesto? Nema problema! Samo je premjestite tamo gdje trebate! Vidjet ćemo kako to učiniti u trenu. Jeste li povukli ručicu smjera u pogrešnom smjeru? Nije problem. Zgrabite ručicu i zakrenite je u smjeru u kojem trebate. Opet ćemo vidjeti kako to učiniti. Je li jedna od vaših ručica smjera preduga ili prekratka? Nema problema uopće. Samo kliknite na nju, a zatim je povucite duže ili kraće prema potrebi (da, i mi ćemo vidjeti kako to učiniti). Staze su u potpunosti uredljive u svakom trenutku, tako da nema apsolutno nikakvog razloga da se brinete ako ne učinite grešku ili je ispravite prvi put. Zar se to već ne osjećate malo bolje?
Zakretanje i promjena ručica smjera
Kao što sam spomenuo, oni se zovu "ručke" jer ih možete zgrabiti kao ručke i pomicati ih. Pogledajmo kako to učiniti. Prvo ćemo pogledati kako rotirati obje ručke u isto vrijeme. Pomoću točke sidrenja i dvije ručke smjera koje smo već stvorili držite tipku Ctrl (Win) / Command (Mac). Ikona vašeg alata za olovku privremeno se pretvara u alat za izravni odabir (bijela strelica) i to je zato što odabranim alatom olovke držanje "Ctrl / naredba" postaje brzi prečac za privremeni pristup alatu za izravan odabir koji je što koristimo za odabir različitih dijelova našeg puta. Zatim jednostavno kliknite mali oblik dijamanta na kraju bilo koje ručke smjera (klikanje na samu "liniju" neće uspjeti, tako da uvijek morate kliknuti oblik dijamanta na kraju ručke da biste učinili bilo što s njom) i povucite je oko sidrene točke da biste je rotirali. Dok rotirate jednu ručicu, druga se ručica okreće zajedno s njom u suprotnom smjeru, nalik na pilu. Također možete primijetiti da čim pokrenete ručicu, ikona pokazivača miša ponovo će se promijeniti, ovaj put u ikonu Move Tool jer premještamo nešto s jednog mjesta na drugo:
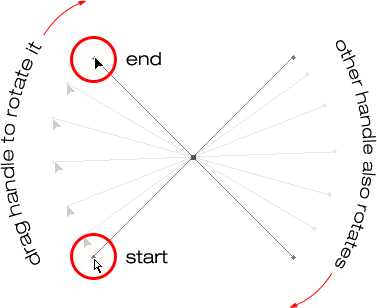
Držite "Ctrl" (Win) / "Command" (Mac) i kliknite na kraj bilo koje ručice smjera, a zatim povucite ručicu da biste je zakrenuli oko sidrene točke. Dok povlačite jednu ručicu, druga se okreće u suprotnom smjeru.
Nakon što povučete kvaku, možete otpustiti tipku "Ctrl / Command". Ne treba je držati dolje cijelo vrijeme.
Da biste promijenili veličinu ručke smjera dok je okrećete, jednostavno povucite kraj ručke prema točki sidra da biste je skratili ili je povucite od točke sidra kako biste je učinili duljom. Kao što sam gore spomenuo, kraća ručka učinit će krivulju kraćom, a dulja ručica će napraviti krivulju duljom. Međutim, ne možete istovremeno promijeniti obje ručke pa ako trebate promijeniti obje, trebate ih povući duže ili kraće. Jedino što možete učiniti obojici istovremeno je rotirati ih. Ako ste već okrenuli gumb miša nakon što rotirate ručke, a pokazivač se promijenio natrag u ikonu Pen Pen i trebate promijeniti veličinu jedne ručke, morat ćete još jednom pritisnuti tipku "Ctrl / Command" da biste privremeno privremeno pritisnuli vratite se na alat za izravni odabir, a zatim kliknite i povucite kraj ručke da biste promijenili veličinu:
Povucite krajeve ručki prema točki sidra kako biste ih skratili ili povucite dalje od točke sidra kako biste ih duljili.
Sada pogledajmo kako rotirati ručke neovisno jedan o drugom. To rotate one handle without affecting the other one, first release your mouse button if you've been rotating or resizing the handles so your cursor changes back into the Pen Tool icon. Then, instead of holding down "Ctrl/Command", which moves both handles at once, hold down your Alt (Win) / Option (Mac) key and click on the end of either of the direction handles. You'll see your cursor change into the Convert Point Tool icon, which looks like a simplified arrow made of only two lines, almost like an upside down letter "v" (except that it's not quite upside down). Then, simply drag the handle around the anchor point to rotate it, just as you did before, and this time, the handle will rotate independently of the other one, breaking the connection between them:
Hold down "Alt" (Win) / "Option" (Mac) and click on the end of either of the direction handles, then drag the handle to rotate it around the anchor point independently of the other handle.
Again, you can release your "Alt/Option" key after you've started dragging. You don't have to hold it down the whole time.
You can also resize direction handles using the "Alt/Option" key in exactly the same way as you can with the "Ctrl/Command" key. If you're in the process of rotating a handle, simply drag it in towards the anchor point to make it shorter or away from the anchor point to make it longer. If you've already released your mouse button and your cursor is showing the Pen Tool icon again, you'll need to hold down "Alt/Option" once again, then click on the end of the handle and drag it to resize it.
Is there a difference between resizing the handles using "Ctrl/Command" and using "Alt/Option" to do it? Yes there is. If you haven't yet "broken the connection" between the handles by dragging one independently of the other, resizing a handle using "Ctrl/Command" will keep the handles connected together. It won't resize both handles at once, but it won't break the connection between them either so you'll still be able to rotate them together if you need to. If you resize a handle using "Alt/Option", you'll break the connection between the handles. Even if you don't rotate the handle as you're resizing it, the connection will still be broken.
What if you've broken the connection between the handles by rotating them using "Alt/Option" and then want to rotate them together again? Can you "rebuild the connection", so-to-speak, by selecting one of them while holding down "Ctrl/Command" as before? Good question, and the answer is no. Once you've broken the connection between the handles, the "Ctrl/Command" key on its own won't bring it back. You'll need to select one of the handles while holding Ctrl+Alt (Win) / Command+Option (Mac) at that point in order to move the handles together again.
Quick Summary So Far …
We've covered a lot of information here about working with direction handles, so before we move on and start drawing some actual curves, let's do a quick recap:
- To add an anchor point, simply click with the Pen Tool.
- To add an anchor point with direction handles extending out from it, click with the Pen Tool, then drag away from the anchor point before releasing your mouse button. The further you drag, the longer the direction handles will be.
- To rotate the direction handles together, hold down Ctrl (Win) / Command (Mac), which will temporarily switch you to the Direct Selection Tool, then click on the end of either handle and drag it around the anchor point. The other handle will rotate in the opposite direction.
- To rotate the direction handles independently, hold down Alt (Win) / Option (Mac), which will temporarily switch you to the Convert Point Tool, then click on the end of either handle and drag it around the anchor point. The other handle will not rotate.
- To resize handles without breaking the connection between them, hold down Ctrl (Win) / Command (Mac) to switch to the Direct Selection Tool, then click on the end of either handle. Drag it towards the anchor point to make it shorter, or drag it away from the anchor point to make it longer.
- To resize handles and break the connection between them, hold down Alt (Win) / Option (Mac) to switch to the Convert Point Tool, then click on the end of either handle. Drag it towards the anchor point to make it shorter, or drag it away from the anchor point to make it longer.
- To rotate the direction handles together after breaking the connection, hold down Ctrl+Alt (Win) / Command+Option (Mac), then click on the end of either handle and drag it around the anchor point. The other handle will once again rotate with it.
Okay, that pretty much covers the basics of how to control the direction handles. Let's see how we can use them to draw some curves!
We've covered a lot of ground so far. We know about anchor points and direction handles. We know that in order to draw straight path segments, all we need to do is lay down a series of anchor points wherever we need them simply by clicking with the Pen Tool, and as we add more and more anchor points, we add more straight sections to our path. We know how to create direction handles and how to rotate them, either together or separately, and how to resize them.
We know how to turn a path into a selection by clicking on the "Load path as selection" icon at the bottom of the Paths palette or by simply pressing "Ctrl+Enter" (Win) / "Command+Return" (Mac) on the keyboard. One thing I didn't mention yet is that regardless of whether our path consists of straight lines,
curves, or a combination of straight lines and curves, converting it into a selection is done exactly the same way, and we've already learned how to do it, which means we're well on our way to mastering making selections with the pen! All we need to do is get a bit of practice drawing curves, which is exactly what we're about to do!
Još uvijek se pomičete? Preuzmite ovaj vodič kao PDF!
Drawing A Curve
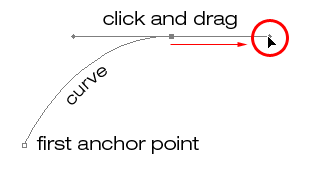
Let's once again start fresh, either by opening up a new blank document in Photoshop or by deleting what you've already done. We're going to draw our first curve so we can put all of our newly-aquired direction handle knowledge to use. First, with the Pen Tool selected and the Paths option selected in the Options Bar, click once somewhere in your document to add an anchor point. Just click, don't click and drag. You should have one single anchor point on the screen when you're done.
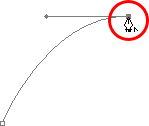
Then, move your mouse cursor up and to the right of your initial anchor point. Click again to add a second anchor point, but this time, drag your mouse a little to the right of the anchor point to drag out direction handles. Hold down Shift as you drag to constrain your movement to a horizontal direction. As you drag out the direction handles, you'll see your path appearing as a curve between the two anchor points! The further you drag your mouse, the longer you make the direction handles, and the more of a curve you create:
Click once to add an anchor point, then click and drag out a second anchor point with direction handles, creating a curved path segment between the two points.
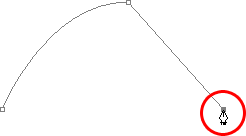
Click down and to the right of the second anchor point to add a third anchor point. This time, don't click and drag, just click:
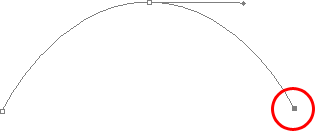
Add a third anchor point down and to the right of the second one by clicking with the Pen Tool.
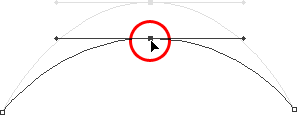
As soon as you add the third anchor point, a second path segment will appear, joining the second anchor point with the third one. And because our second anchor point has direction handles extending from it, this new path segment is also curved! We now have a nice, smooth arc starting from the first point on the left, then passing through the anchor point with the direction handles up top, and coming to an end at the third point.
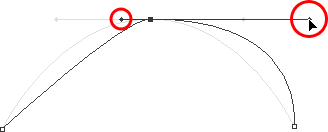
One thing you may have noticed, and you can see it in the screenshot above, is that when you added the third anchor point, the direction handle extending out the left side of the second anchor point disappeared. It's still there, Photoshop simply hid it from view. To see it again, use the keyboard shortcut we've already learned to temporarily switch to the Direct Selection Tool, which is by holding down the Ctrl (Win) / Command (Mac) key, and then click on the second anchor point to select it. As soon as you do, the missing direction handle reappears as if it was there the whole time (which it was):

Hold down the "Ctrl" (Win) / "Command" (Mac) key to temporarily switch to the Direct Selection Tool, then click on the top anchor point to select it. The missing anchor point reappears.
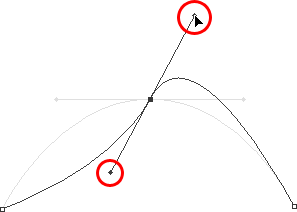
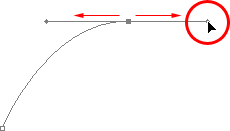
With your "Ctrl/Command" key still held down so you still have access to the Direct Selection Tool, try resizing each direction handle by clicking on the end of each one to select it and then dragging it towards and away from its anchor point. Again, hold "Shift" as you drag to constrain your movement horizontally, and watch what happens. As you increase the length of a handle, you get more of a curve, and as you decrease its length, you get less of a curve. Also notice that each handle controls its own side of the curve. The handle on the left controls the curve coming into the anchor point from the left, and the handle on the right controls the curve flowing out from the anchor point on the right.
Here, I've made my handle on the left shorter, and as we can see, there's much less of a curve now than there was originally, almost becoming a straight line. I've also made the handle on the right longer, and as a result, the curve on the right is now much more pronounced. The faint curve is the original for comparison:
Change the shape of the curves by resizing the direction handles. The left handle controls the left curve, and the right handle controls the right curve.
I'm going to undo my changes by pressing Ctrl+Alt+Z (Win) / Command+Option+Z (Mac) a couple of times to set my direction handles back to their original sizes so they're equal length once again. Now let's try rotating the handles. Hold down "Ctrl/Command" once again to access the Direct Selection Tool, then click on the end of either handle to select it and try rotating it around the anchor point. Since we selected the handle with "Ctrl/Command", both handles rotate together. Here I've dragged my left handle down and to the right, and the angle of the curve on the left changed along with it, now appearing as more of a slope as it rises up towards the anchor point. By dragging the left handle down and to the right, I caused the right handle to rotate up and to the left, and again, the angle of the curve on the right changed along with it, now rising above the anchor point briefly before making a steep decent down to the anchor point on the right. Again, the faint curve is the original for comparison:
Rotate the direction handles to change the angle of the curves. Select a handle while holding "Ctrl" (Win) / "Command" (Mac) to rotate both handles together.
The Dreaded "Loop"
One thing you want to avoid is rotating the handles too far, which will cause your path segments to overlap and create loops. Here, I've rotated my handles all the way around so that the left handle is now on the right and the right handle is on the left, and notice what's happened. My path segments are now overlapping each other, creating a loop:
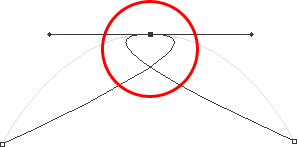
Rotating the direction handles too far causes the path segments to overlap, creating an unwanted loop in the path.
Loops can be caused by rotating the direction handles too far, as I've done above, but more often than not, they're caused by a handle being too long, making the curve too long and causing it to overlap with itself. If that happens, which it does sometimes as you're drawing a path, simply shorten the length of the direction handle. Most people end up creating a whole bunch of loops in their path when they first start working with the Pen Tool, so don't think you're the only one. No need to panic or become frustrated though. As I said, the problem is most likely being caused by a direction handle being too long, and all you need to do is shorten the handle to "un loop" the loop!
I'm going to press Ctrl+Alt+Z (Win) / Command+Option+Z (Mac) a few times once again to undo my changes and reset my path back to the nice smooth arc I started with. Now, what about rotating the direction handles independently of each other? As we learned on the previous page, to rotate the handles separately, instead of selecting them with "Ctrl/Command", we simply select them while holding down Alt (Win) / Option (Mac), which gives us temporary access to the Convert Point Tool. Click on the end of a handle to select it, then drag it with your mouse to rotate it and this time, the other handle will stay in place, breaking the connection between them.
Here, I've selected the handle on the right while holding "Alt/Option" and then rotated it down and to the left. Notice how once again, the angle of the path segment on the right changes to match the new direction of the handle, and this time, the handle on the left, along with the path segment on the left, both stay in place. My path now looks a bit like a shark fin:
Hold down "Alt" (Win) / "Option" (Mac) to temporarily access the "Convert Point Tool", then click on the end of a direction handle to select it and rotate it independently of the other handle.
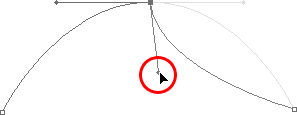
Moving An Anchor Point
One thing we haven't looked at yet is how to move an anchor point. If you recall, I mentioned on the previous page that the Pen Tool is extremely forgiving, and one of the reasons for it, besides being able to rotate and resize our direction handles after we've created them, is that we can easily move anchor points from one spot to another if we need to. As we've already learned, anchor points anchor a path into place. The anchor points themselves, however, are not anchored into place. You can move an anchor point anywhere, anytime, and any path segments that are connected to it will move and adjust right along with it.
To move an anchor point, hold down Ctrl (Win) / Command (Mac) to temporarily access the Direct Selection Tool as we've already been doing, then simply click on the anchor point to select it and drag it to its new location with your mouse. Any path segments connected to it will move with it to the new location. Here, I've dragged my middle anchor point down a bit from its original location (again, the faint path marks the original location for comparison). Notice how the path itself has changed shape to adjust to the new location of the anchor point:
Hold down "Ctrl" (Win) / "Command" (Mac) and click on an anchor point to select it, then drag it to a new location. Any path segments connected to the point will move with it, changing shape as needed.
Normally, when outlining an object with a path to select it using the Pen Tool, you won't need to move to an anchor point quite as far as what I've done above, but it's very common to go back around your path after you've created it and nudge a few anchor points here and there to fine-tune the path. Once you've selected an anchor point, you can nudge it up, down, left or right using the arrow keys on your keyboard.
Combining Straight Paths With Curves
What if I didn't want both of my path segments to be curves? What if what I needed was for the first path segment to be curved, but the second one needed to be straight? Let's see how to do that. I'm going to delete my existing path and start over again. First, I'll click to add an anchor point to start things off. Then, just as before, I'll click to add a second anchor point up and to the right of my initial point, and this time, I'll drag out direction handles, which will create a curved path connecting the two points, giving me exactly what I had way up at the start of this page:
Click once to add an anchor point, then click to add a second anchor point and drag out direction handles to create a curve.
I now have my initial curve, but I want my next path segment to be straight. If I was to simply click somewhere to add another anchor point right now, I would get another curve because I have that direction handle extending out from the right side of the last anchor point I added. What I need to do is get rid of that one direction handle. Without a direction handle controlling the angle and length of a curve, we get a straight line.
To remove the handle, leaving only the handle on the left of the anchor point, all I need to do is hold down Alt (Win) / Option (Mac), which will again temporarily switch me to the Convert Point Tool, and then I just click directly on the anchor point. When I do, the direction handle on the right disappears, leaving only the one on the left:
Hold down "Alt" (Win) / "Option" (Mac) and click directly on the anchor point to remove the direction handle on the right, leaving only the one on the left.
Now, with the direction handle gone, if I click to add a new anchor point, I get a straight path segment between the two points :
With the direction handle on the right now gone, clicking to add a new anchor point adds a straight path segment between the two points.
I now have a curved path segment on the left and a straight one on the right! What if I wanted the exact opposite? Suppose I needed to start with a straight path segment and then follow it with a curve? To do that, first I'll start by clicking to add an initial anchor point. Then, since I want a straight path segment, all I need to do is click somewhere else to add a second anchor point, and I automatically get a straight path connecting the two points:
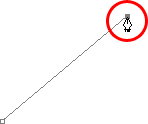
Click with the Pen Tool to add an initial anchor point, then click again somewhere else to add a second anchor point and create a straight path segment between them.
I'm going to keep my mouse button held down after clicking to add my second anchor point because I want my next path segment to be curved, and we know that in order to create a curve, we need a direction handle. To add a handle extending out from the right of my anchor point, I'm going to hold down Alt (Win) / Option (Mac), and with my mouse button still down, I'm simply going to to drag to the right of the anchor point. As I do, a direction handle will drag out along with it:
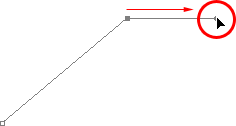
Hold down "Alt" (Win) / "Option" (Mac) and drag out a direction handle on the right of the anchor point.
Notice that the direction handle extended only from the right of the anchor point, not from both sides, leaving my straight path segment on the left in place. And now that I have my direction handle on the right, all I need to do to create my curve is click to add a third point:
Click to add a third anchor point, which creates a curved path segment between the previous anchor point and the new one.
And there we go! I now have a straight path segment on the left, followed by a curved segment on the right. Of course, most paths you draw are going to consist of more than just three anchor points. Let's say I wanted to continue this path, moving in the same general direction towards the right, and I want my next path segment to be curved as well. Just as I did a moment ago, I would leave my mouse button held down after clicking to add my third point. I would hold down Alt (Win) / Option (Mac) and I would drag out another direction handle. So far, we've only been dragging handles out towards the right, but what you really want to do is drag your handles out in the general direction you want the curve to follow. I want to create a curve that goes up and to the right, so I'm going to drag out a small handle in that same general direction:
Drag out your direction handles in the general direction of the curve.
Savjet! A good practice to get into is to keep your direction handles small when first dragging them out, since you never really know how long or at what exact angle they need to be until the actual curve appears, and the curve doesn't appear until you've added both of its anchor points. Once you've added both points and the curve appears, you can easily go back and make any adjustments you need to the handles. You may even want to wait until you've drawn the entire path before worrying about adjusting the handles.
With my direction handle created, I'm going to click to add a fourth anchor point, and I'm going to drag out direction handles from it as well:
Adding a fourth anchor point along with direction handles extending from it.
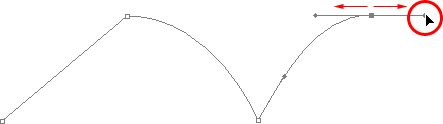
I now have a third segment added to my path, this one being a curve. Notice that this curve actually has two direction handles controlling it, one extending from the right of my third anchor point and one extending from the left of my fourth point:

The third path segment now has two direction handles, one on either end, working together to control the curve.
The overall shape of this curve is now being controlled by the length and direction of both of these handles. Watch what happens to the curve when I move the handles. I'll drag the bottom handle down and to the right, and I'll drag the top handle up and to the left. I'll also drag both of these handles longer. The faint curve is the original for comparison:
Changing the direction and/or length of either handle changes the overall shape of the curve. After rotating and lengthening both handles, the curve now appears in an "S" shape.
The curve is now a bit "S" shaped, and that's because the bottom handle is controlling the angle and length of the curve as it flows out from the third anchor point, while the top handle is controlling the angle and length of the curve as it flows into the fourth point. Changing the length and/or direction of either handle will change the overall shape of the curve.
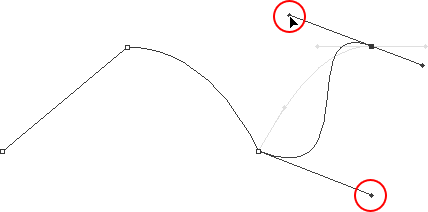
I'm going to press Ctrl+Alt+Z (Win) / Command+Option+Z (Mac) a couple of times to undo the changes I made, so the curve is once again in a simple arc shape as it was a moment ago, and I think I'll finish off this path with another straight segment, which means I'll need to remove that direction handle extending out from the right side of the fourth anchor point. We've already learned how to do that, by holding down Alt (Win) / Option (Mac) and clicking directly on the anchor point itself:
Hold down "Alt" (Win) / "Option" (Mac) and click directly on the anchor point to remove the direction handle on the right.
With the direction handle gone, all I need to do now to add a straight path segment is click to add another anchor point:
The direction handle on the right is now gone, so we can add a straight path segment simply by clicking to add another anchor point.
We could continue this path for as long as we wanted, adding more straight segments and curves, but I think we'll stop here because we've pretty much covered everything we need to know about drawing paths with the Pen Tool at this point. That was a lot of information to take in, especially if this is your first time learning about paths. As I mentioned at the beginning, you won't become a Pen Master simply by reading through this tutorial, just as you won't learn how to ride a bike, or drive a car, learn to swim, or play the piano simply by reading about it. But hopefully you have some sense at this point of how to draw paths with the Pen Tool, how to draw straight path segments, how to draw curves by dragging out direction handles, how to change the length and angle of the curve by rotating and resizing the handles, and how to combine straight and curved segments in a path.
To finish off our look at making selections with the Pen Tool, let's see a practical example of how to select an object with curves.
Here, we have a photo of a couple of dolphins leaping out of the water. Definitely a couple of very curvy creatures:

A photo of two dolphins jumping out of the water.
Let's say we want to select these dolphins so we can use them for a design or a collage, or whatever the case may be. If you were to try selecting them with the Lasso Tool, which is most likely what you would end up using if you didn't know how to use the Pen Tool, not only would you have a tough time, you'd have an even tougher time trying to convince yourself that you were happy with the results when you were done. The reason is because the Lasso Tool simply isn't capable of making curved selections very well. The biggest problem with it, besides being a pixel-based selection tool, is that it relies on you having a steady enough hand to move it smoothly around the curves. Even if you don't suffer from a caffeine addiction, you could drive yourself crazy trying to draw a perfectly smooth curve with your mouse, or even with a pen tablet, and when you've finally given up, you'll still be left with a selection full of rough, jagged edges that just scream "amateur!". No one likes to be called an amateur, especially when there's no need for it thanks to the Pen Tool!
Examine The Object First
Whenever you're about to select something with the Pen Tool, before you begin, take a moment to examine the object carefully to get a sense of where you're going to need to place your anchor points. Forget about all the details in the object and focus only on its shape. Where are the areas where the shape changes direction? Which parts of the shape are straight? Which parts are curved? If there's a curve, is it a smooth, continuous arc or does the angle change at a spot along the curve? Visualize in your mind where you're going to need to place your anchor points, because when you place one, you always want to be thinking about the next one and what the path segment between the two points needs to look like.
A Tool Of Elegance
One more thing to keep in mind is that the Pen Tool is meant to be a tool of elegance . It's not a nail gun or a staple gun. You don't want to just go clicking around your shape adding anchor points all "willy nilly" (that's a technical term). When using it to draw curves, you want those curves to be nice and smooth, otherwise we might as well just stick with the Lasso Tool. To keep the curves flowing smoothly, we need to limit the number of anchor points we use to create them. That's why you want to take a moment to examine the object first and visualize where the anchor points need to be. If you can outline a large section of the shape using only one curve with an anchor point on either end, that's what you want to do, because that's what's going to give you the kind of results you're looking for. The kind of results that scream "definitely not an amateur!".
Let's select these dolphins. I'm going to start my path in the middle of the photo, at the spot where the side of the dolphin on the left overlaps the rear flipper of the dolphin on the right. There's no right or wrong place to begin a path. This is just where I've decided to start. The first part of that rear flipper is straight, so since I don't need a direction handle to create a straight path segment, I'm simply going to click once with my Pen Tool to add my first anchor point, which will serve as the starting point for my path:
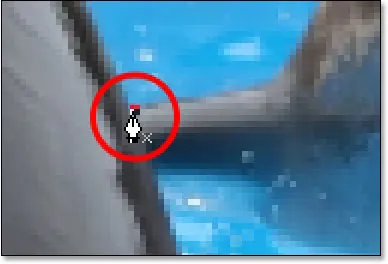
Adding the first anchor point.
As I mentioned earlier, you'll probably find it helpful to zoom in on your image as you're drawing your path. To scroll the image around on the screen as you're zoomed in, hold down the spacebar, which will switch you temporarily to the Hand Tool and allow you to move the image around on the screen by clicking and dragging it.
The top of that flipper actually has a slight curve to it as it approaches the dolphin's tail section, so for my second anchor point, I'm going to click at the point where the flipper and tail section meet, and I'm going to drag out short direction handles, dragging up and to the right in the direction that the tail section is moving. Notice that I've now created a slight curve along the flipper:
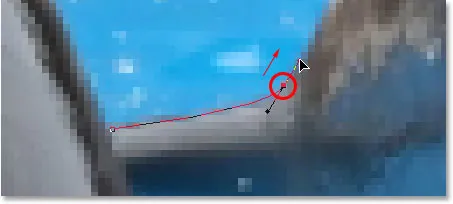
Adding the second anchor point and dragging out small direction handles to add a slight curve to the first path segment.
As I continue up along the tail, I can see that it stays straight for a short distance, followed by a curve to the right, so I'm going to click to add a third anchor point at the spot where the curve begins. This gives me a straight path segment between the previous point and the new one. I know there's a short direction handle extending out from the previous anchor point, which normally means that my new path segment will be a curve, not a straight section, but because the handle is so short and is also moving in the same direction as the path segment, there is no noticeable curve to it. Consider it a "mostly straight" path segment:
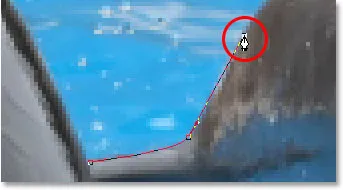
Clicking to add the third anchor point, creating a (mostly) straight path segment.
Continuing along, we come to the first real curve in our path. For this, I'm going to need to drag out a direction handle from the anchor point I just added, so I'm going to hold down Alt (Win) / Option (Mac), then drag out a handle in the general direction where I want the curve to flow as it starts. Notice how I'm only dragging out a handle from the one side of the anchor point, not both:
Hold "Alt" (Win) / "Option" (Mac) to drag out a direction handle from one side of an anchor point.
To add the curve, I'll click and drag at the spot where the curve ends, shaping the curve as I drag out the handles until it matches the curve of the dolphin's tail. If I needed to, I could also go back and change the length and direction of the handle at the start of the curve to fine-tune it, but in this case, I don't need to do that:
Adding an anchor point at the opposite end of the curve and dragging out direction handles from it, rotating and resizing them as needed until the curve matches the curve of the object.
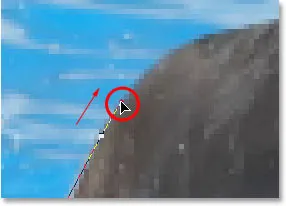
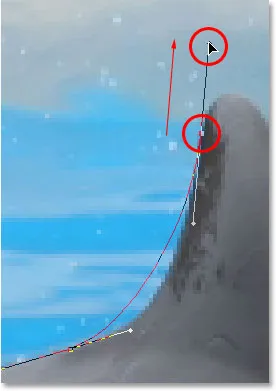
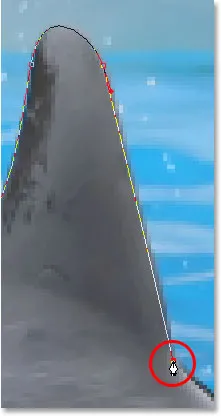
The next area of the dolphin is pretty straight, right up until its back begins to merge with its dorsal fin, at which point there's another curve, so I'm going to click to add an anchor point just before the curve up the dorsal fin begins, which is going to give me another "mostly straight" path segment between the previous point and the new point. Then I'm going to once again hold down Alt (Win) / Option (Mac) and drag out a direction handle as I prepare for my next path segment which will be curved:
Click to add an anchor point, then hold down "Alt" (Win) / "Option" (Mac) and drag out a direction handle to prepare for the next path segment.
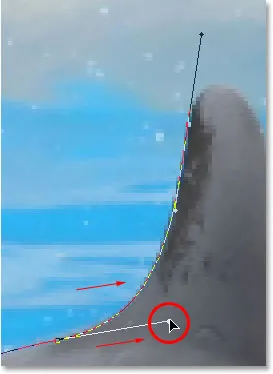
The left side of the dorsal fin consists mainly of one continuous curve upward until it gets near the very top, at which point the shape changes, so to create this curve, I'm going to click and drag at the point near the top where the curve will change direction. As we can see in the screenshot, this adds a curved path segment between the previous anchor point and the new one, but the curve is not yet following along the shape of the fin. It's going to need some fine-tuning:
Adding a curve along the left side of the dorsal fin. The curve still needs some adjusting.
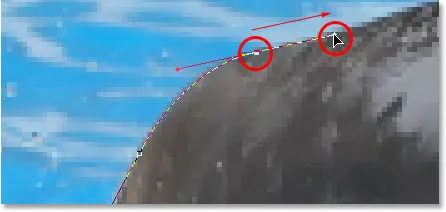
To adjust the curve, I'm simply going to hold down the Ctrl (Win) / Command (Mac) key, which gives me temporary access to the Direct Selection Tool, and I'm going to drag the handle extending out from the bottom anchor point towards the right to lengthen it, which is going to pull the angle of the curve in towards the right along with it, lining it up nicely with the curve of the fin. I've also rotated the top direction handles slightly in a clockwise direction just to be nit-picky, but the majority of the adjustment was done using the bottom direction handle:
Adjust the curve by adjusting its direction handles.
To add a curve around the top of the fin, I'll click and drag on the opposite side of it to add another anchor point with short direction handles. Notice though that we run into a bit of a problem. The direction handle on the left side of the curve is too long and it's pulling the curve away from the top of the fin:
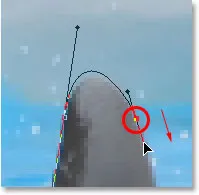
The direction handle on the left of the curve is too long, resulting in the curve not following the shape of the fin.
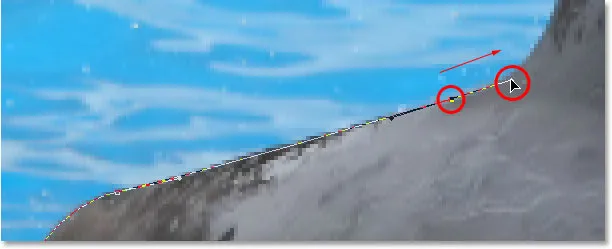
To fix that, all I need to do is once again hold down Ctrl (Win) / Command (Mac), then click on the end of the handle to select it and drag it shorter until the curve is the proper shape:
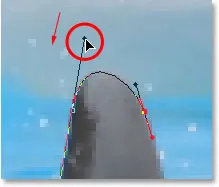
Shortening the length of the direction handle to adjust the shape of the curve.
Let's finish creating our path around the dorsal fin. The remainder of the fin is basically a straight line, so I'm going to click at the base of the fin to add another anchor point which adds the straight path segment, completing our path around the fin:
Adding an anchor point at the base of the fin to finish drawing the path around it.
Since you and I would both be here all day if I was to continue commenting on every anchor point, direction handle and path segment as we make our way slowly around the dolphins, and since we've covered everything we need to know at this point, I'm going to go ahead and draw the rest of the path, outlining both dolphins:
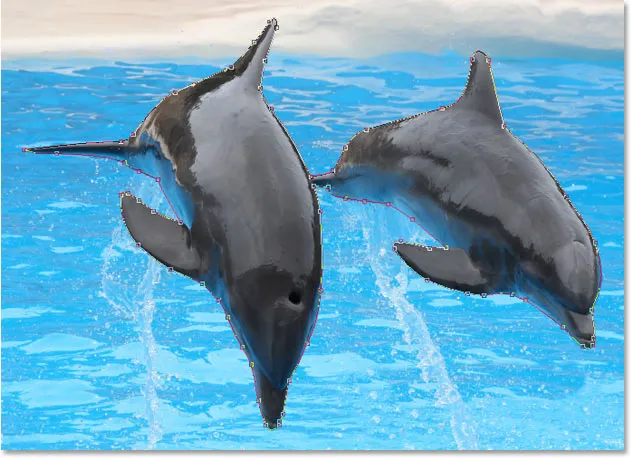
Both dolphins are now outlined by the path.
The dolphins have now been outlined with the path, and if we look at the Paths palette, we can see that sure enough, we have a path in the shape of the dolphins:
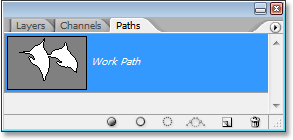
Photoshop's Paths palette showing the outline of the dolphins in the preview thumbnail.
As we've learned, Photoshop automatically names the path "Work Path", which means it's temporary and will be replaced if we start a new path. If you wanted to save it, you would need to double-click on the name "Work Path" and rename it to something else, like "Dolphins" in this case. I'm not going to worry about that, since I have no need to save it. All I want to do at this point is convert my path into a selection, and since I'm already in the Paths palette, I'll do that by clicking on the Load path as selection icon at the bottom of the palette:
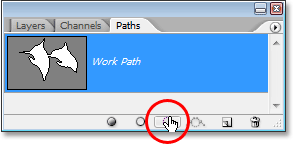
Clicking the "Load path as selection" icon at the bottom of the Paths palette.
I could also have used the keyboard shortcut Ctrl+Enter (Win) / Command+Return (Mac) . Either way converts my path into a selection, and if I look at my photo, I can see that my path has indeed become a selection around the dolphins:

The path around the dolphins has now been converted into a selection.
Kamo dalje …
I tu ga imamo! The dolphins are now selected and ready for whatever plans we have for them. And with that, we wrap up our look at drawing paths and making selections with the Pen Tool in Photoshop! Više o Photoshopovim alatima za odabir potražite u našem Kako napraviti odabir u Photoshopu. Posjetite naš odjeljak Osnove Photoshopa za više Photoshop tema!